Hiển thị các bài đăng có nhãn HTML5. Hiển thị tất cả bài đăng

Thứ Tư, 7 tháng 11, 2018

Modern Frontend Developer in 2018

Before we begin with this post, just to give you an idea about me and about this roadmap; I have been doing the Fullstack Development for the past 5 years and currently working as a lead engineer at tajawal where I have to wear many different hats. It is not only my hobby but also one of my job responsibilities to keep an eye on the trends and to keep the other developers well trained. I see a lot of confusion among the beginners (and experienced alike) when it comes to staying up to date. I had lots of friends and emails asking me for guidance back in 2017 on what should they learn if they want to be in this career. So to save myself the hassle and to help the others, I decided to prepare these charts once and for all, so that whenever somebody would ask, I would just share the link to these charts. And this is how these charts were born.
Initially they were just flat out recommendations for the tools but I decided yesterday to give them a bit more structure, add details and design them in the steps form so to give you a better idea about what to pick and in what order.
I am still working on the Backend and DevOps parts but the frontend part is ready and you can have a look at it below.

Just a random image because thumbnail needs to be a part of the article 🙉

Before I go about explaining different sections in the roadmap, let me take the time to put this disclaimer here:
The purpose of this roadmap is to give you an idea about the landscape and to guide you if you are confused about what to learn next and not to encourage you to learn what is hip and trendy. You should grow some understanding of why one tool would be better suited for some cases than the other and remember hip and trendy never means best suited for the job
So let’s get started —you can find the detailed image below, however in this article I will explain each step in the roadmap one by one also.
First thing that you would want to do is learn the basics which includes learning the basics of HTML, CSS and some familiarization with JavaScript syntax.

Learn the basics of HTML

HTML is what gives structure to your pages. Its like the human skeleton that keeps you standing. First thing that you would want to do is learn the syntax and learn everything that it has to offer. You should focus on learning the below:
  • Learn the basics and how to write semantic HTML
  • Understand how to divide page into sections and how to structure the DOM properly
Task — Once you have learnt the basics of HTML, make at least 5 HTML pages. I would recommend you to pick any website e.g. look at any github profile page or twitter’s login page. And focus on structuring the content properly. It is going to be ugly, but don’t worry about that for now and keep your main focus on proper structure.

Learn some CSS

Now that we have learnt how to prepare the skeleton for the page, its time to add some skin on top of it and to make it look beautiful. CSS — Cascading stylesheets are used to add beauty to your HTML pages.
  • First thing that you will have to do is learn about the syntax and familiarize yourself with the common CSS properties.
  • Learn about the box model and how to prepare layouts using Grid and Flexbox
  • Once you are done with that, learn how to make your websites responsive with media queries.
Task –– Once you have the basics out of the way, next thing that you should do is style the HTML pages that you made in the last step. For example if you wrote the HTML page for the Github profile, its time to apply the CSS and make it actually look like the actual Github profile page. Do so with all the 5 pages that you wrote in the previous step.

Learn the Basics of JavaScript

JavaScript is what lets you make your HTML pages more interactive. For example all these sliders, popups and toast notifications that you see on websites and when it reloads certain parts of the pages without having to reload the page, it is all done with JavaScript. In this step, you are going to learn the basics of JavaScript to prepare you for the Journey –
  • Learn the syntax and the basic constructs of the language.
  • Learn how to manipulate DOM with JavaScript e.g. how to remove some element from the page, how to add some element, adding and removing classes, applying CSS styles etc with JavaScript.
  • After you are done with that learn and understand the topics such as scopes, closures, hoisting and event bubbling etc.
  • Learn how to make HTTP calls with XHR or Ajax. Ajax is what lets you perform certain actions without reloading the page.
  • After you have learnt that now it is time to learn about all the new features in ES6+. ES6 is just a version of JavaScript which introduced lots of interesting updates to the language e.g. classes, different ways to declare variables, added new methods to arrays, string concatenation etc. Most of the articles that you will find online, they will use Babel to explain ES6 which is a transpiler that converts the new JavaScript to old JavaScript since it is not supported by the old browsers. But don’t worry about Babel for now, just get the idea about the concepts and use them in any of the latest browser which support ES6 for practicing. We will revisit ES6 later on.
You should now be feeling that the things are getting real. You need a pat on the back if you have been following along. These were some of the most important things that you have just learnt 👏

Should I learn jQuery?

There was a time when every one was crazy about jQuery and for good reasons; it was a powerful library that provided a wrapper on top of JavaScript and let you perform anything in a browser compatible way. But long gone are those days now, it isn’t being used that much for the new projects but there are still people using it. You don’t have to learn it but it is really easy and it would be beneficial for you if you want to have a look.

Time to Practice

I say this a lot and I will say it here again, you don’t learn anything without practice. You might have a momentary feeling that you understand something but it would soon go away if you don’t practice. Make sure that you practice as much as you can, while you are following this roadmap.
Go ahead and make some responsive website and add interactivity with JavaScript. You can copy any existing webpage that you might find interesting online but remember to use everything that you have learnt till this point.
Once you have made some of the websites, its time to get into the real business now. So go to github.com and search for some projects and try to open some pull requests on some open-source projects. Some of the ideas for pull requested are listed below :
  • Enhance the UI, make any demo pages responsive or improve the design
  • Look at any of the open issues that you can solve
  • Refactor any of the code that you think can be improved
Link this repo, tell them you are learning and ask for feedback on your PR and how you can improve.
While I would recommend this Github part, it needs some knowledge of git and is optional. You don’t have to do this but if you do, you will find it really beneficial — you will be amazed that how many people are willing to help you if you just ask. You can find many free resources for git, try this one.

Give yourself a pat on the Back

You have got the basics out of the way. If you have learnt everything well, you can find yourself some freelance work or maybe a full time job. However, don’t stop here, there is still a long way to go if you want to have a better career.

Package Managers

Before this point, if you were to use some external library e.g. a plugin or any external widget, you have to download the JavaScript and CSS files manually and put them in the project, and then those libraries or plugins release new versions, you have to download the newer files and put them in your projects again, which is an extreme hassle. Package managers take this hassle away from your workflow. They help you bring external libraries and plugins into your projects, so that you don’t have to worry about copying the libraries manually or go through the hassle of updating them when they release new versions. There is yarn and npm available. Both are almost same, there are only implementation, you can pick any of them and once you learnt to use one the other would be just the same.

Let’s use what we have learnt

After you have got the basic understanding of package managers, go ahead and install some external library in the webpages that you made above e.g. install some toast plugin and when user clicks a button, show him the toast message or create a login form and do the form validation using some form validation library and play with different options and see how to install different versions.
While you are at it, make sure to read about semantic versioning

CSS Preprocessors

Preprocessors enrich CSS with the functionality that it isn’t capable of by default. There are different many options Sass, Less, Stylus etc. If I were to pick one, I would go for Sass. However, PostCSS has been gaining a lot of traction lately, it is a nice-to-have and is sort of “Babel” for CSS. You can use it stand-alone or on top of Sass also. I would recommend you to learn Sass for now and revisit PostCSS later when you have time.

CSS Frameworks

You don’t need to learn CSS frameworks any more, however if you would want to pick any, there is one under every rock. The ones that I liked the most among the ones that I tried are Bootstrap, Materialize and Bulma. But if you look at their demand in market I would pick Bootstrap if I was starting today.

CSS Organization

As your applications grow, CSS start to become messy and unmaintainable. There are multiple ways to structure your CSS better for scalability e.g. there is OOCSS, SMACSS, SUITCSS, Atomic and BEM. You should know about the differences between them but I prefer BEM.

Build Tools

Tools to help you in the building/bundling and development of JavaScript applications. This category includes linters, task runners and bundlers.
For task runners, there used to be different many options including npm scripts, gulp, grunt etc. But at this time, since webpack lets you handle most of the stuff that we used to do with gulp, there is only npm scripts in the task runners now which you can use to automate the tasks that webpack might be capable of doing. You don’t need to learn Gulp, however later on if you find some time, feel free to have a look at it and see if it can help you in your application.
For the linters, again there used to be many options including ESLint, JSLint, JSHint and JSCS. But currently there is mostly ESLint so go for it.
For the module bundlers, again several different options including Parcel, Webpack, Rollup, Browserify etc. If you have to pick one, close your eyes and pick Webpack for now. Rollup is quite common also but it is recommended to be used mostly for the libraries; when it comes to apps, there is webpack. So teach yourself webpack for now and revisit this section for Rollup later on if you want to.

Time to Practice — Create something

Congrats! You can call yourself 75% modern JavaScript developer now. Now go ahead and create something with all that you have learnt. Maybe create some sort of library in which you have to use Sass and JavaScript. Then use Webpack to convert Sass to CSS and use babel in it to transpile ES6 code. Once you are done with, release it on Github and npm.

Pick a Framework

In the old roadmap, this section used to be next to the basics but I changed it to be after Sass, build tools and package managers because you will be using all of that in the frameworks and without the knowledge, it might seem scary to you.
Again in frameworks, there are several options. But commonly used one these days are React, Vue and Angular. There is more and more demand for React.js these days. However, you can pick any of the listed ones and you will be fine. Personally I would pick React or Angular. Just a quick note here, as a beginner you might find Angular to be a bit easier comparatively, probably because it supports almost everything out of the box e.g. powerful router with support for lazy loading, HTTP client with support for interceptors, dependency injection, component CSS encapsulation etc without having to worry about picking external libraries. But React definitely has an upper hand looking at the community around it and the way team at facebook has been working to improve it. Just make sure to not pick anything because of the hype of it, google it, compare and see what suites you best.
I will leave the comparison and my personal experience with both for another post but since this post is about learning, here is how you might find the learning curves for Angular and React
Learn curves in the graph below consider the fact that you already have an understanding of TypeScript and basic idea of Rx.JS. For the “why” I will cover that in some future post but mainly it is because of some of the standardization and some of the key features that angular provides out of the box. But that doesn’t mean React is bad, both have their own place, I will cover that extensively in some upcoming post.
Have a look at both and see what suites you best.
Once you have made your choice for framework, there are certain other things that you might have to learn. For example if you decided to go with React; you might have to learn Redux or Mobx for the state management, depending upon the size of application that you will be working. Mobx is suitable for small to mid-sized applications, Redux is more suitable for larger scale applications. And you might even not need any of them and depend upon the native state management in React if your app allows that.
If you pick Angular, you will have to do TypeScript (you can develop angular applications without it also but it is recommended to use it) and Rx.js which will also benefit you out of your Angular applications. It is a really powerful library and is also suitable for functional programming.
And if you pick Vue.js, you might have to learn Vuex which is sort of similar to Redux but for Vue.
You should note that, Redux, Mobx and Rx.js are not just bound to these frameworks, you can use these out in your vanilla JavaScript apps also. Also, if you pick Angular from the list, make sure it is Angular 2+ and not Angular 1+

Time to Practice

Now you know _everything_ that one might need to build a modern JavaScript application. Go ahead and make some application with whatever framework you picked. You can find some of the ideas in the ideas directory in the repository; pick anything and start!
And once you are done making, read about how to measure and improve performance. For example look at Interactivity Time, Page Speed Index, and Lighthouse Score etc

Progressive WebApps

And once you are done with all of steps listed above, learn about service workers and how to make progress web apps.

Testing your Apps

There are lots and lots of different tools for different purposes. I mostly find myself using a combination of Jest, Mocha, Karma and Enzyme. However, before you jump and pick any, it would be better if you first understand the different testing types, look at all the options available and use the ones most suitable for your needs.
Here is a really nice summary to get you started

Static Type Checkers

Static type checkers help you to add type checking to JavaScript. You don’t need to learn these but they really give you superpowers and can be learnt in a few hours and then you can keep . There is mainly TypeScript and Flow. I love TypeScript and would pick it but feel free to check both and pick one of your liking.

Server Side Rendering

The skills that you have got till this point should be sufficient to get you a position for any of the “Frontend Engineering” roles. But don’t stop here!
Learn about server side rendering in whatever framework you picked. There are different options, depending on what framework you are using. For example if you decided to use React, most notable options are Next.js and After.js. For angular, there is Universal. And for Vue.js there is Nuxt.js.
There could be things still missing in the roadmap but this is all of what you need for any “Frontend Engineering” role. And remember the key is to practicing as much as you can. It will look scarier in the beginning and you will feel like you are not grasping but that is normal and over time you will feel that you are getting better and better. And don’t forget to ask for help if you are stuck, you will be amazed by how much people are willing to help ..or at least I am 😉
Feel free to befriend me on twitter or say hi by email. And with that this post comes to an end. Until next time, stay tuned!

Sưu tầm: Modern Frontend Developer in 2018
Khác biệt giữa HTML và HTML5

khác biệt giữa html và html5

Giới thiệu

Những ai mới vào thế giới thiết kế web có thể thường nghe từ “Markup” và tự hỏi nó có nghĩa gì, và khác gì so với từ “code”. Trước đây, ngôn ngữ markup được thiết kế để xử lý, định nghĩa và hiển thị văn bản; nhung tag và chạy chữ với style để giúp dễ đọc cho máy tính. Về lịch sử, ngôn ngữ markup lấy cảm hứng từ process của manuscript marking-up qua hướng dẫn của máy in, được lấy từ markups viết tay. HTML là một ngôn ngữ markup nổi tiếng nhất được dùng. Trong vài năm trở lại đây, một bản cập nhật cho ngôn ngữ này là HTML5 được xuất bản. Trong bài hướng dẫn, chúng tôi sẽ cung cấp sự khác biệt giữa HTML và HTML5.

HTML là gì?

HTML hoặc Hyper-Text Markup Language có thể được hiểu là ngôn ngữ chính của WordWide Web. Hầu hết những trang web được host trên mạng đều được viết bởi vài phiên bản của HTML. Qua HTML, lập trình viên có thể đảm bảo chắc chắn làm thế nào để  multimedia, văn bản và hyperlink giữa chúng hiển thị trên trình duyệt web. Từ những elements mà kết nối đến văn bản của bạn (hypertext) tới việc giúp những tài liệu này tương tác được (ví dụ: forms); tất cả là thành phần của HTML.
Chuẩn HTML được phát triển bởi W3C (World Wide Web Consortium) vào năm 1997. Trong HTML, tags được dùng để định nghĩa cấu trúc văn bản; tags, và elements được định nghĩa bằng ký tự < và >. Một vài ví dụ trước có đề cập đến tags là headings, tables, và paragraph, vâng vâng. Trình duyệt chịu trách nhiệm để reder một trang web qua những tags này. Từ đó, HTML là chuẩn duy nhất để phát triển web. Trong những ngày đầu tiên, tất cả nội dung và style tags được dồn vào một ngôn ngữ lớn, phức tạp. Qua thời gian, W3C quyết định tách nội dung và style của một trang web vì nghĩ nó cần thiết; việc này dẫn đến sự bắt đầu của style sheets. Ngày nay, tags được dùng để định nghĩa style của một văn bản (ví dụ: FONT) đã lỗi thời vì mọi người thích style sheets và chỉ còn có tag định nghĩa nội dung (ví dụ H1) là còn tồn tại như là một thành phần cốt lõi của HTML.
HTML được cập nhật nhiều qua thời gian, và hiện tại, chuẩn HTML mới nhất là HTML5. HTML5 tất nhiên vẫn là ngôn ngữ markup chính, nhưng nó cung cấp thêm nhiều tính năng hơn HTML và đã xóa một số tính nghiêm ngặt thường thấy trong XHTML. Hằng ngày, tính năng mới được thêm vào HTML5, nhưng vẫn chưa có phiên bản mới được triển khai. Khác biệt cơ bản giữa HTML và HTML5 có thể hiểu là bất kể hình hay tiếng đều không phải là thành phần chính của HTML trong khi đó, cả hai có thể được xem phần bổ sung của HTML5.
History of HTML

Khác biệt chính giữa HTML và HTML5

Một điều chắc chắn về mảng công nghệ thông tin là các cập nhật/thay đổi định kỳ là chắc chắn xảy ra. Không ngôn ngữ nào có thể tồn tại mà không có phiên bản mới. HTML cũng không ngoại lệ. HTML5 được phát hành với mục đích chính là cải thiện trải nghiệm người dùng World Wide Web. Như đã nhắc ở phần trước, thuận lợi lớn nhất của HTML5 khiến nó vượt hơn các phiên bản không tên khác là nó có audio phiên bản cao và hỗ trợ video, vốn không phải là thành phấn chính của các phiên bản HTMLs trước. các khác biệt giữa HTML và HTML5:
  • SVG, canvas và những hình dạng vector đều được hỗ trợ bởi HTML5, khi HTML nếu muốn sử dụng hình vector chỉ có thể dùng nó trong một công nghệ khác như, Flash, VML và silver light.
  • HTML5 sử dụng web SQL databases, application cache để lưu dữ liệu tạm, trong khi đó, HTML chỉ có cache của trình duyệt được dùng cho mục đích này.
  • Một khác biệt nữa giữa HTML và HTML5 đáng nhắc đến là HTML không cho phép JavaScript chạy trong web browser (thay vì vậy nó chạy trong interface thread của browser), trong khi đó HTML5 hỗ trợ hoàn toàn cho JavaScript để chạy nền (nhờ vào JS web worker API của HTML5).
  • HTML5 không dựa trên SGML, cho phép nó tăng luật parsing, có thể tương thích mạnh mẽ hơn
  • Trong HTML5, inline MathML và SVG có thể được dùng trong văn bản nơi mà không được hỗ trợ trong HTML.
  • Một số elements lỗi thời đã bị loại bỏ hoàn toàn là: isindex, noframes, acronym, applet, basefont, dir, font, frame, frameset, big, center, strike, tt.
  • HTML5 hỗ trợ nhiều loại điều khiển form, ví dụ: ngày giờ, email, số lượng, khoảng, số điện thoại, URL, tìm kiếm, vâng vâng
  • Có nhiều element được giới thiệu trong HTML. Một vài trong số chúng là quan trọng nhất: summary, time, aside, audio, command, data, datalist, details, embed, wbr, figcaption, figure, footer, header, article, hgroup, bdi, canvas, keygen, mark, meter, nav, output, progress, rp, rt, ruby, section, source, track, video.
Difference Between HTML and HTML5

Các Ưu điểm được cung cấp bởi HTML5 cho lập trình viên.

HTML5 muốn lập trình viên có nhiều hơn sự linh hoạt trong việc thiết kế website và có rất nhiều cải tiến mạnh mẽ đáng để nhắc đến như sau:

1. Persistent error handling: 

Hầu hết các trình duyệt đều hỗ trợ parse cho những cấu trúc không chính xác của HTML code, nhưng nhiều năm về trước, không có chuẩn nào để xử lý việc này. Có nghĩa là lập trình viên khi gặp trình duyệt mới phải tự kiểm tra HTML trên các trình duyệt để đảm bảo lỗi có thể được xử lý bởi nhiều kiến trúc khác nhau. Vì vậy, sự đồng nhất về khả năng xử lý lỗi của HTML5 là một khác biệt và lợi thế rất lớn trong vấn đề này. Sự tối ưu trong thuật toán parsing được dùng trên HTML5 là một lợi thế không thể đếm được. Thống kê cho thấy gần 90% website có thể có lỗi về coding cho nên việc xử lý những lỗi như vậy là rấ quan trọng. Hơn nữa, quản lý lỗi cũng tiết kiệm được chi phí và thời gian cho lập trình viên.

2. Cải thiện ngữ nghĩa cho elements: 

Để cải thiện lỗi code, ,To enhance code insinuation, một số cải tiến đã được thực thiện cho vai trò ngữ nghĩa của một số elements đã có sẵn. Section, article, nav và header là những element mới đã thay thế hầu hết các element div cũ, và việc này cũng giúp ích rất nhiều cho việc quét lỗi, vì nó đỡ phức tạp hơn nhiều.

3. Tăng tính tương thích cho ứng dụng web:

Một trong số các mục đích chính của HTML5 là cho phép trình duyệt xử lý như là một nền tảng ứng dụng. Website trong quá khứ ít phức tạp hơn nhưng qua thời gian, đòi hỏi cũng tăng lênh. HTML5 cho phép lập trình viên tăng quyền quản trị của hiệu năng website. Trong quá khứ, lập trình viên phải dùng rất nhiều phương thức khác nhau vì hạn chế về công nghệ phía server và browser extension chưa có. Bây giờ, với HTML5, không cần phải sử dụng JS hoặc Flash để chạy nữa (như đã từng phải làm với HTML4) vì các element hiện diện trong HTML5 đã có khả năng thực thi tất cả chức năng.

4. Dựng web mobile dễ dàng hơn:

Kể cả bây giờ, tạo một phiên bản mobile cho website cũng có thể khiến lập trình viên đau đầu. Nhân khẩu của việc sở hữu điện thoại di động đã bùng nổ trong thập kỷ qua, tạo nên một nhu cầu thực sự cho việc nâng cấp chuẩn HTML. Người dùng cuối muốn có thể truy cập web bất kỳ lúc nào với bất kỳ thiết bị nào, cho nên việc có một website responsive là cần thiết. HTML5 hỗ trợ rất nhiều cho di động, vì có thể phục vụ cho các thiết bị điện tử này.

5. Canvas element:

Một tính năng được nhắc đến nhiều nhất của HTML là element <canvas>. Tag độc nhất này đã gây ra ảnh hưởng lớn cho Adobe Flash. Kể cả khi có rất nhiều website vẫn sử dụng Flash, HTML5 vẫn khiến cho nhiều người yêu thích hơn, tin hay không, Flash sẽ sớm trở nên lỗi thời.
Sử dụng canvas element, lập trình viên có thể vẽ đồ họa sử dụng nhiều màu và hình dạng khác nhau chỉ bằng cách dùng script  (ví dụ: JavaScript). Cũng cần biết là canvas chỉ là graphic container để định nghĩa hình ảnh, một script cần phải được thực thi. Ví dụ khi mà JavaScript được dùng chung với canvas là:
<canvas id=”TestCanvas” width=”200″ height=”100″></canvas>
 var c = document.getElementById(“TestCanvas”);
    
 var context = c.getContext(“2d”);
    
 context.fillStyle = “#FF0000”;
    
 context.fillRect(0,0,140,75);

6. The Menu element:

Element mới thêm là <menu> và <menuitem> là thành phần tương tác được, chuyên dùng nhưng không hay được bàn đến trong cộng đồng lập trình viên. Tuy nhiên, những element này có thể được dùng để đảm bảo khả năng tương tác của web.
<menu> tag được dùng để đại diện cho lệnh menu trong mobile hoặc desktop application vì tính đơn giản. Cách dùng có thể là:
    <body contextmenu=”new-menu”>
        
     <menu id=” new-menu” type=”context”>
        
     <menuitem>Hello!</menuitem>
      
     </menu>
    </body>

7. Data Attributes có thể được tùy chỉnh:

Bạn có thể thêm attributes tùy ý trước khi có HTML5, nhưng rất khó, ví dụ, trong HTML4, custom attributes sẽ đôi khi làm tắt trang của bạn hoàn toàn, và chúng có thể thường gây xung đột dữ liệu. Dữ liệu data-* attribute trong HTML5 đã khắc phục được việc này. Có rất nhiều cách dùng cho attribute này, nhưng cái chính là làm nơi chưa thông tin của các elements khác nhau. Bây giờ, custom data có thể được thêm vào, nó cũng giúp lập trình viên tăng cơ hội tạo một trang web tương tác tốt và hiệu quả cao mà không cần phải tìm hiểu về server hoặc call Ajax.

8. Tạm biệt cookies:

Local storage là một nâng cấp cực lớn của HTML5. Trong những ngày trước-HTML5, nếu lập trình viên muốn lưu bất kỳ thông tin nào, họ phải tạo cookies. Cookies có thể lưu một vài loại dữ liệu (chưa kể, mọi người ghét chúng) và điều này làm localstorage trở nên có nhiều lợi thế hơn so với HTML5. localStorage object là một phần của global windows namespace và có thể được truy cập bất kỳ đâu nếu muốn qua scripts.

Thủ thuật HTML5

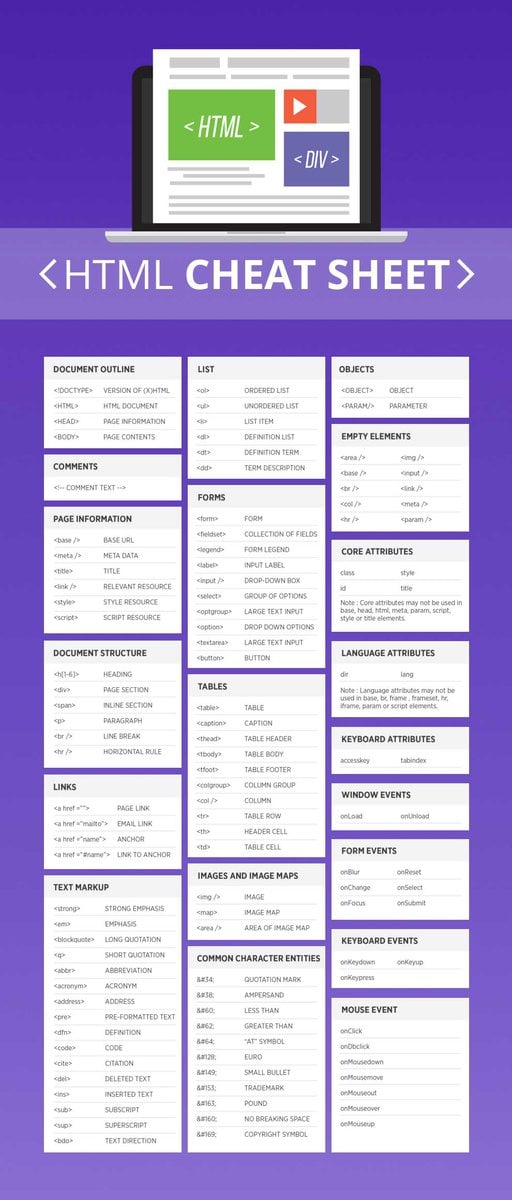
Thủ thuật HTML5 có thể giúp ích rất nhiều nếu bạn vừa mới bắt đầu học ngôn ngữ mới. Sử dụng những style sheet HTML5 bên dưới và bắt đầu dùng HTML. Bài thủ thuật này có tất cả những tag phổ biến nhất của HTML (bao gồm HTML5)
HTML5 Cheat Sheet

Ưu điểm của HTML5 cho người dùng cuối

HTML5 mang lại trải nghiệm hoàn toàn mới cho cả lập trình viên lẫn người dùng cuối. Một số ưu điểm nổi trội cho người dùng cuối là:
  1. Mobile browser hiện giờ đã tốt hơn rất nhiều, nhờ vào công nghệ HTML5, so với trước đây khi mà phát triển web dựa trên HTML.
  2. Phụ thuộc vào website di động là rất cao, lên tới 30% lượng người dùng ghét ứng dụng. Vì vậy nếu một user muốn sử dụng dịch vụ của một công ty, nhưng không muốn tải ứng dụng, họ chỉ cần truy cập vào website.
  3. Việc loại bỏ Adobe Flash giúp cho lập trình viên cung cấp trải nghiệm tốt hơn cho người dùng. Sử dụng JavaScript và MPEG4 liên kết với HTML5 giúp cuộc sống trở nên tốt đẹp hơn cho tất cả mọi người.
  4. Khả năng hỗ trợ audio và video element gốc có nghĩa là user không phải tải plugin đi kèm để xem multimedia trên website. Việc hỗ trợ hoàn toàn cho media khiến HTML5 trở thành lý do chính nó được dùng nhiều hơn HTML ngày nay.

Kết luận

Một phiên bản mới của bất kỳ ngôn ngữ nào cũng tốt hơn, và HTML5 là một minh chứng tốt nhất. Với mỗi năm trôi qua, lập trình viên sẽ càng cái thiện, tận dụng ưu thế của HTML5. Hơn nữa, social media cũng được trông đợi sẽ làm thay đổi hơn nữa ngôn ngữ này.
Khi làn sóng thay đổi tấn công nhiều lập trình viên trên thế giới, có thể thấy được sự tích hợp HTML5 sẽ ngày càng nhay. Để tối ưu hiệu suất của những trình duyệt tân tiến ngày nay, hãy sử dụng HTML5 sớm nhất có thể.
Sưu tầm từ Khác biệt chính giữa HTML và HTML5

Thứ Ba, 29 tháng 12, 2015

Tạo ứng dụng Web chạy offline trên thiết bị di động bằng HTML5

Giới thiệu
Việc sử dụng ứng dụng trên điện thoại di động đang là một xu hướng phát triển. Tuy nhiên, việc kết nối mạng liên tục là một trở ngại lớn khi sử dụng Web trên điện thoại như là phần đầu cuối của công nghệ điện toán đám mây. Ứng dụng Web truyền thống không làm việc khi không có sự kết nối mạng. Một giải pháp để giải quyết vấn đề này là sử dụng 2 thành phần của HTML5:
  • Ứng dụng Web chạy Offline (Offline Web Applications).
  • Công nghệ lưu trữ dữ liệu bên phía Client (Client-side database storage).
Người dùng sử dụng những chức năng của dịch vụ điện toán đám mây (clouf functions) trên một chiếc điện thoại, làm việc offline với một ứng dụng đã được cài đặt trên máy điện thoại, đồng thời sử dụng một cơ sở dữ liệu lưu trữ ngay trên máy (local database), và có thể chia sẻ dữ liệu với phần còn lại của dịch vụ điện toán đám mây khi chương trình kết nối trở lại với mạng.
Trong bài viết này, chúng ta sẽ học kỹ thuật chi tiết cho một tình huống đặc trưng. Một bài mẫu sử dụng HTML5 để viết ứng dụng quản lý hàng hóa.
Bạn có thể download source code của ứn dụng trong bài viết này tại mục Tải mã nguồn phía dưới.
Tổng quan
Hình 1 hiển thị các thành phần chính của ứng dụng

Hình 1. Các thành phần cơ bản của một ứng dụng Web chạy Offline
Trang HTML
Trang HTML, phần cơ bản của ứng dụng, có vai trò làm nơi lưu trữ dữ liệu (model). Nó chứa dữ liệu hiển thị và những thông tin mặc định. Những thẻ HTML của trang được tổ chức trong một mô hình cây phân cấp của Mô hình đối tượng tài liệu HTML (HTML Document Object Model (DOM)). Người dùng tạo những sự kiện thông thường trong quá trình yêu cầu và trả dữ liệu (request-response cycle) với việc tải trang và gọi những hàm JavaScripts. Điều lưu ý là ứng dụng này bao gồm một trang HTML đơn giản mà không cần các trang HTML khác để gửi và nhận dữ liệu. Toàn bộ các hành động sẽ được diễn ra trên chỉ một trang HTML.
JavaScript
Thành phần JavaScript chứa các hàm điều khiển của ứng dụng. Các đối tượng HTML được điều khiển thông các sự kiện của hàm JavaScript. JavaScripts có thể truy xuất đến tất cả các đối tượng giao diện người dùng (User interface) và dùng chúng để nhập liệu và tính toán. Kết quả của quá trình tính toán sẽ được hiển thị cho người dùng xem bằng cách chỉnh sửa trang HTML.
Cascading Style Sheet
Cascading Style Sheet (CSS) mô tả giao diện hiển thị của trang HTML. Nhiệm vụ hiển thị được bỏ qua ở đây đê nhằm mục đích đơn giản hóa giải pháp cho ứng dụng. Trong quá trình phán triển này, chỉ có kiểu hiện thị mặc định được sử dụng. Đối với thiết bị di động, có rất nhiều thư viện JavaScript/CSS dành cho người dùng ứng dụng Web khác nhau (ví dụ iUi dành cho iPhone) . Hãy xem thêm trong link dưới đây: http://www.ibm.com/developerworks/web/library/wa-offlineweb/index.html#resources . Dù cần thiết phải thỏa mãn nhu cầu người dùng, nhưng sự độc lập nền tảng (platform dependency) là một hạn chế của giải pháp này.
Database
Công nghệ HTML5 chuẩn có hỗ trợ công nghệ lưu trữ dữ liệu trên máy người dùng (local database storage). Điều này được triển khai trong các phiên bản mới của trình duyệt web Safari và hầu hết các trình duyệt web khác. Trình duyệt hỗ trợ một cơ sở dữ liệu nhúng, với việc sử dụng SQLite, người dùng có thể truy xuất dữ liệu từ JavaScript bằng cách sử dụng câu truy vấn SQL.
Manifest
File manifest là phần bắt buộc phải triển khai cho ứng dụng Web chạy offline. Nó chứa một danh sách những file cần thiết phải tải.
Ứng dụng ví dụ
Phần này sẽ giới thiệu tổng quan một ứng dụng, được gọi là MyHomeStuff. Đây là một ứng dụng quản lý hàng hóa, người dùng có thể tự lưu trữ thông tin của các sản phẩm. Hình 2 hiển thị ứng dụng trên iPhone.

Hình 2 – Hiển thị ứng dụng trên iPhone.
HTML chi tiết
Trang HTML chứa các định nghĩa, thẻ meta để tối ưu hóa việc hiển thị trên thiết bị di động, tham chiếu đển các file ngoài (manifest, JavaScript, css), và các đối tượng HTML thiết yếu để tạo nên cấu trúc ứng dụng. Listing 1 hiển thị code
1
2
3
4
5
6
7
8
9
10
11
12
13
14
15
16
17
18
19
20
21
22
23
24
25
26
27
28
29
30
<!DOCTYPE HTML>
      <html manifest="MyHomeStuff.manifest">
          <head>
              <meta name="viewport" content="width=device-width;
                initial-scale=1.0; maximum-scale=1.0; user-scalable=0;">
             <title>MyHomeStuff</title>
             <script type="text/javascript" src="MyHomeStuff.js" ></script>
              </head>
                <body onload="onInit()">
                <h3>Overview</h3>
        <ul id="itemData" ></ul>
    <h3>Details</h3>
        <form name="itemForm">
            <label for="id">Id: </label>
            <input type="text" name="id" id="id" size=2 disabled="true"/>
            <label for="amount">Amount: </label>
            <input type="text" name="amount" id="amount" size = 3/>
            <label for="name">Name: </label>
            <input type="text" name="name" id="name" size=16 /> <br>
            <br>
            <input type="button" name="create" value="create"
                onclick="onCreate()" />
            <input type="button" name="update" value="update"
                onclick="onUpdate()" />
            <input type="button" name="delete" value="delete"
        </form>
    <h4>Status</h4>
        <div id="status"></div>
   </body>
</html>
Listing 1. HTML code
Các thuộc tính điều khiển sự kiện (Event handler attributes) của các đối tượng xác định được các hàm JavaScript gọi khi trang được tải là sự kiện nhấn (onclick).

Trang HTML của ứng dụng Web chạy offline bắt đầu là thẻ <!DOCTYPE HTML>. Thuộc tính manifest chỉ đến file MyHomeStuff.manifest <html manifest = “MyHomeStuff.manifest”>.

Như đã đề cập, file manifest xác định những file cần thiết phải tải từ cache. Ứng dụng này bao gồm một file HTML và một file JavaScript file. File HTML có sự tham chiếu đến file manifest sẽ được tự động thêm vào vùng đệm (cache) của ứng dụng. File manifest chỉ bao gồm nội dung dưới đây:

CACHE MANIFEST

MyHomeStuff.js
Listing 2. Manifest file
Chi tiết JavaScript
Mã JavaScript được chứa trong 3 khối:
  • Các hàm khởi tạo
  • Các hàm cập nhật
  • Một vài hàm tiện ích
Khối đầu tiên chứa các điều khiển để khởi tạo ứng dụng (onload) và khởi tạo cơ sở dữ liệu, như trong Listing 3.
1
2
3
4
5
6
7
8
9
10
11
12
13
14
15
16
17
18
19
20
21
22
23
24
25
26
27
28
29
function onInit(){
    try {
        if (!window.openDatabase) {
            updateStatus("Error: DB not supported");
        }
        else {
            initDB();
            createTables();
            queryAndUpdateOverview();
        }
    }
    catch (e) {
        if (e == 2) {
            updateStatus("Error: Invalid database version.");
        }
        else {
            updateStatus(&quot;Error: Unknown error &quot; + e + &quot;.&quot;);
        }
        return;
    }
}
function initDB(){
    var shortName = 'stuffDB';
    var version = '1.0';
    var displayName = 'MyStuffDB';
    var maxSize = 65536; // in bytes
    localDB = window.openDatabase(shortName, version, displayName, maxSize);
}
Listing 3. JavaScript init code
Trong code ở phía trên:
  • Hàm onInit đầu tiên mở cơ sở dữ liệu bắt buộc thông qua hàm openDatabase, việc này sẽ không làm được với một trình duyệt không hỗ trợ local database.
  • Hàm initDB mở cơ sở dữ liệu trong trình duyệt HTML5.
  • Sau khi mở cơ sở dữ liệu thành công, SQL DDL tạo bảng được thực thi. Cuối cùng những hàm truy vấn dữ liệu và hiển thị trên trang HTML được gọi.
Mỗi hàm trong khối JavaScript thứ hai làm công việc truy xuất và hiển thị dữ liệu. Sự thống nhất này một đặc điểm của kiến trúc Model 1 (xem http://www.ibm.com/developerworks/web/library/wa-offlineweb/index.html#resources), đây cách đơn giản nhất để phát triển một ứng dụng Web. Với một nhiệm vụ thực tế, ta có thể ứng dụng mô hình MVC (Model View Controller) để thực hiện.
Để xây dựng danh sách ví dụ, hàm queryUpdate được gọi. Listing 4 hiển thị code:
1
2
3
4
5
6
7
8
9
10
11
12
13
14
15
16
17
18
19
20
21
22
23
24
25
26
27
28
29
30
31
32
33
34
35
36
37
38
39
function queryAndUpdateOverview(){
    //remove old table rows
    var dataRows = document.getElementById("itemData").getElementsByClassName("data");
    while (dataRows.length &gt; 0) {
        row = dataRows[0];
        document.getElementById("itemData").removeChild(row);
    };
    //read db data and create new table rows
    var query = "SELECT * FROM items;";
    try {
        localDB.transaction(function(transaction){
            transaction.executeSql(query, [], function(transaction, results){
                for (var i = 0; i < results.rows.length; i++) {
                    var row = results.rows.item(i);
                    var li = document.createElement("li");
                    li.setAttribute("id", row['id']);
                    li.setAttribute("class", "data");
                    li.setAttribute("onclick", "onSelect(this)");
                    var liText =
                        document.createTextNode(row['amount'] + " x "+ row['name']);
                    li.appendChild(liText);
                    document.getElementById("itemData").appendChild(li);
                }
            }, function(transaction, error){
                updateStatus("Error: " + error.code + "
Message: " + error.message);
            });
        });
    }
    catch (e) {
        updateStatus("Error: Unable to select data from the db " + e + ".");
    }
}
Listing 4. JavaScript overview code
Trong code phía trên:
  • Dữ liệu cũ được xóa từ cây mô hình DOM.
  • Một câu lệnh truy vấn tất cả dữ liệu được gọi.
  • Tất cả dữ liệu đươc hiển thị trong một danh sách.
  • Một sự kiện điều khiển, onSelect, được gọi khi một trong tất cả các đối tượng được click.
Những hàm trong khối này cũng chứa các điều khiển sự kiện cho thanh chứa các nút nhấn và danh sách bao gồm: onUpdateonDeleteonCreate và onSelect. Listing 5 hiển thị code của hàm onUpdate. (onCreate và onDelete cũng có cấu trúc tương tự, không được hiển thị ở đây, bạn có thể download tất cả code của ứng dụng ví dụ trong phần phía dưới).
1
2
3
4
5
6
7
8
9
10
11
12
13
14
15
16
17
18
19
20
21
22
23
24
25
26
27
28
29
30
function onUpdate(){
    var id = document.itemForm.id.value;
    var amount = document.itemForm.amount.value;
    var name = document.itemForm.name.value;
    if (amount == "" || name == "") {
        updateStatus("'Amount' and 'Name' are required fields!");
    }
    else {
        var query = "update items set amount=?, name=? where id=?;";
        try {
            localDB.transaction(function(transaction){
                transaction.executeSql(query, [amount, name, id],
                function(transaction, results){
                    if (!results.rowsAffected) {
                        updateStatus("Error: No rows affected");
                    }
                    else {
                        updateForm("", "", "");
                        updateStatus("Updated rows:"
                            + results.rowsAffected);
                        queryAndUpdateOverview();
                    }
                }, errorHandler);
            });
        }
        catch (e) {
            updateStatus("Error: Unable to perform an UPDATE " + e + ".");
        }
    }
}
Listing 5. JavaScript update code
Trong code phía trên:
  • Những trường giá trị được đọc vào kiểm tra tính hợp lệ(validated).
  • Nếu giá trị không hợp lệ, câu lệnh update được thực hiện.
  • Kết quả của những truy vấn được hiển thị trong trang HTML đã được chỉnh sửa.
Hàm onSelect được thực thi khi người dùng chọn một đối tượng trong danh sách. Form chi tiết sẽ được điền đầy đủ dữ liệu bằng cách sử dụng code trong Listing 6 dưới đây:
1
2
3
4
5
6
7
8
9
10
11
12
13
14
15
16
17
18
19
20
21
22
function onSelect(htmlLIElement){
    var id = htmlLIElement.getAttribute("id");
    query = "SELECT * FROM items where id=?;";
    try {
        localDB.transaction(function(transaction){
            transaction.executeSql(query, [id], function(transaction, results){
                var row = results.rows.item(0);
                updateForm(row['id'], row['amount'], row['name']);
            }, function(transaction, error){
                updateStatus("Error: " + error.code + "
Message: " + error.message);
            });
        });
    }
    catch (e) {
        updateStatus("Error: Unable to select data from the db " + e + ".");
    }
}
Listing 6. JavaScript select code
Trong code phía trên:
  • Xác định ID của đối tượng được chọn
  • Câu lệnh truy vấn được thực hiện.
  • Một hàm sẽ update chi tiết form với danh sách dữ liệu được chọn.
Khối JavaScript với những hàm tiện ích bắt đầu với các điều khiển dữ liệu, với các tham số cần thiết truyền vào cho câu lệnh truy vấn.
1
2
3
4
5
6
7
errorHandler = function(transaction, error){
    updateStatus("Error: " + error.message);
    return true;
}
nullDataHandler = function(transaction, results){
}
Listing 7. JavaScript handler code
Để tránh việc dư thừa, những hàm tiện ích điền chi tiết bên trong form (updateForm) và thông báo trạng thái (updateStatus), như phía dưới:
1
2
3
4
5
6
7
8
9
function updateForm(id, amount, name){
    document.itemForm.id.value = id;
    document.itemForm.amount.value = amount;
    document.itemForm.name.value = name;
}
function updateStatus(status){
    document.getElementById('status').innerHTML = status;
}
Listing 8. JavaScript util code
Triển khai
Một chiếc điện thoại iPhone được dùng để chạy ứng dụng này với trình duyệt Safari.
File manifest phải được lưu bởi HTTP server với text/cache-manifest Mime type. Sau khi mở ứng dụng trên iPhone, lưu trữ Bookmark và chuyển sang chế độ offline airplane. Ứng dụng sẽ được mở khi bookmark được chọn, và hoạt động không cần kết nối mạng.
Tóm tắt
Tiêu điểm của bài viết này là kỹ thuật tạo một ứng dụng Web chạy offline. Mô hình ứng dụng quản lý được minh họa bằng công nghệ HTML5 là lưu trữ dữ liệu trên máy người dùng (local database).
http://www.mediafire.com/?nf530a5bereb8ne


Nguyễn Duy Hoàng (FPT Aptech Hà Nội)

Sưu tầm từ: http://tapchilaptrinh.vn/2012/07/30/tao-ung-dung-web-chay-offline-tren-thiet-bi-di-dong-bang-html5/

Link tham khảo : http://www.tcs.com/SiteCollectionDocuments/White%20Papers/TEG_Whitepaper_Developing_Offline_Web_Application_Using_HTML5_0212-1.pdf
http://labs.ft.com/2012/08/basic-offline-html5-web-app/