Thứ Ba, 29 tháng 12, 2015
Tạo ứng dụng Web chạy offline trên thiết bị di động bằng HTML5
Giới thiệu
Việc
sử dụng ứng dụng trên điện thoại di động đang là một xu hướng phát
triển. Tuy nhiên, việc kết nối mạng liên tục là một trở ngại lớn khi sử
dụng Web trên điện thoại như là phần đầu cuối của công nghệ điện toán
đám mây. Ứng dụng Web truyền thống không làm việc khi không có sự kết
nối mạng. Một giải pháp để giải quyết vấn đề này là sử dụng 2 thành phần
của HTML5:
-
Ứng dụng Web chạy Offline (Offline Web Applications).
-
Công nghệ lưu trữ dữ liệu bên phía Client (Client-side database storage).
Người
dùng sử dụng những chức năng của dịch vụ điện toán đám mây (clouf
functions) trên một chiếc điện thoại, làm việc offline với một ứng dụng
đã được cài đặt trên máy điện thoại, đồng thời sử dụng một cơ sở dữ liệu
lưu trữ ngay trên máy (local database), và có thể chia sẻ dữ liệu với
phần còn lại của dịch vụ điện toán đám mây khi chương trình kết nối trở
lại với mạng.
Trong
bài viết này, chúng ta sẽ học kỹ thuật chi tiết cho một tình huống đặc
trưng. Một bài mẫu sử dụng HTML5 để viết ứng dụng quản lý hàng hóa.
Bạn có thể download source code của ứn dụng trong bài viết này tại mục Tải mã nguồn phía dưới.
Tổng quan
Hình 1 hiển thị các thành phần chính của ứng dụng

Hình 1. Các thành phần cơ bản của một ứng dụng Web chạy Offline
Trang HTML
Trang
HTML, phần cơ bản của ứng dụng, có vai trò làm nơi lưu trữ dữ liệu
(model). Nó chứa dữ liệu hiển thị và những thông tin mặc định. Những thẻ
HTML của trang được tổ chức trong một mô hình cây phân cấp của Mô hình
đối tượng tài liệu HTML (HTML Document Object Model (DOM)). Người dùng
tạo những sự kiện thông thường trong quá trình yêu cầu và trả dữ liệu
(request-response cycle) với việc tải trang và gọi những hàm
JavaScripts. Điều lưu ý là ứng dụng này bao gồm một trang HTML đơn giản
mà không cần các trang HTML khác để gửi và nhận dữ liệu. Toàn bộ các
hành động sẽ được diễn ra trên chỉ một trang HTML.
JavaScript
Thành
phần JavaScript chứa các hàm điều khiển của ứng dụng. Các đối tượng
HTML được điều khiển thông các sự kiện của hàm JavaScript. JavaScripts
có thể truy xuất đến tất cả các đối tượng giao diện người dùng (User
interface) và dùng chúng để nhập liệu và tính toán. Kết quả của quá
trình tính toán sẽ được hiển thị cho người dùng xem bằng cách chỉnh sửa
trang HTML.
Cascading Style Sheet
Cascading
Style Sheet (CSS) mô tả giao diện hiển thị của trang HTML. Nhiệm vụ
hiển thị được bỏ qua ở đây đê nhằm mục đích đơn giản hóa giải pháp cho
ứng dụng. Trong quá trình phán triển này, chỉ có kiểu hiện thị mặc định
được sử dụng. Đối với thiết bị di động, có rất nhiều thư viện
JavaScript/CSS dành cho người dùng ứng dụng Web khác nhau (ví dụ iUi
dành cho iPhone) . Hãy xem thêm trong link dưới đây: http://www.ibm.com/developerworks/web/library/wa-offlineweb/index.html#resources
. Dù cần thiết phải thỏa mãn nhu cầu người dùng, nhưng sự độc lập nền
tảng (platform dependency) là một hạn chế của giải pháp này.
Database
Công
nghệ HTML5 chuẩn có hỗ trợ công nghệ lưu trữ dữ liệu trên máy người
dùng (local database storage). Điều này được triển khai trong các phiên
bản mới của trình duyệt web Safari và hầu hết các trình duyệt web khác.
Trình duyệt hỗ trợ một cơ sở dữ liệu nhúng, với việc sử dụng SQLite,
người dùng có thể truy xuất dữ liệu từ JavaScript bằng cách sử dụng câu
truy vấn SQL.
Manifest
File
manifest là phần bắt buộc phải triển khai cho ứng dụng Web chạy
offline. Nó chứa một danh sách những file cần thiết phải tải.
Ứng dụng ví dụ
Phần
này sẽ giới thiệu tổng quan một ứng dụng, được gọi là MyHomeStuff. Đây
là một ứng dụng quản lý hàng hóa, người dùng có thể tự lưu trữ thông tin
của các sản phẩm. Hình 2 hiển thị ứng dụng trên iPhone.

Hình 2 – Hiển thị ứng dụng trên iPhone.
HTML chi tiết
Trang
HTML chứa các định nghĩa, thẻ meta để tối ưu hóa việc hiển thị trên
thiết bị di động, tham chiếu đển các file ngoài (manifest, JavaScript,
css), và các đối tượng HTML thiết yếu để tạo nên cấu trúc ứng dụng.
Listing 1 hiển thị code
1
2
3
4
5
6
7
8
9
10
11
12
13
14
15
16
17
18
19
20
21
22
23
24
25
26
27
28
29
30
| <!DOCTYPE HTML> <html manifest="MyHomeStuff.manifest"> <head> <meta name="viewport" content="width=device-width; initial-scale=1.0; maximum-scale=1.0; user-scalable=0;"> <title>MyHomeStuff</title> <script type="text/javascript" src="MyHomeStuff.js" ></script> </head> <body onload="onInit()"> <h3>Overview</h3> <ul id="itemData" ></ul> <h3>Details</h3> <form name="itemForm"> <label for="id">Id: </label> <input type="text" name="id" id="id" size=2 disabled="true"/> <label for="amount">Amount: </label> <input type="text" name="amount" id="amount" size = 3/> <label for="name">Name: </label> <input type="text" name="name" id="name" size=16 /> <br> <br> <input type="button" name="create" value="create" onclick="onCreate()" /> <input type="button" name="update" value="update" onclick="onUpdate()" /> <input type="button" name="delete" value="delete" </form> <h4>Status</h4> <div id="status"></div> </body></html> |
Các thuộc tính điều khiển sự kiện (Event handler attributes) của các đối tượng xác định được các hàm JavaScript gọi khi trang được tải là sự kiện nhấn (onclick).
Trang HTML của ứng dụng Web chạy offline bắt đầu là thẻ <!DOCTYPE HTML>. Thuộc tính manifest chỉ đến file MyHomeStuff.manifest <html manifest = “MyHomeStuff.manifest”>.
Như đã đề cập, file manifest xác định những file cần thiết phải tải từ cache. Ứng dụng này bao gồm một file HTML và một file JavaScript file. File HTML có sự tham chiếu đến file manifest sẽ được tự động thêm vào vùng đệm (cache) của ứng dụng. File manifest chỉ bao gồm nội dung dưới đây:
CACHE MANIFEST

MyHomeStuff.js
Chi tiết JavaScript
Mã JavaScript được chứa trong 3 khối:
-
Các hàm khởi tạo
-
Các hàm cập nhật
-
Một vài hàm tiện ích
Khối đầu tiên chứa các điều khiển để khởi tạo ứng dụng (onload) và khởi tạo cơ sở dữ liệu, như trong Listing 3.
1
2
3
4
5
6
7
8
9
10
11
12
13
14
15
16
17
18
19
20
21
22
23
24
25
26
27
28
29
| function onInit(){ try { if (!window.openDatabase) { updateStatus("Error: DB not supported"); } else { initDB(); createTables(); queryAndUpdateOverview(); } } catch (e) { if (e == 2) { updateStatus("Error: Invalid database version."); } else { updateStatus("Error: Unknown error " + e + "."); } return; }}function initDB(){ var shortName = 'stuffDB'; var version = '1.0'; var displayName = 'MyStuffDB'; var maxSize = 65536; // in bytes localDB = window.openDatabase(shortName, version, displayName, maxSize);} |
Listing 3. JavaScript init code
Trong code ở phía trên:
-
Hàm onInit đầu tiên mở cơ sở dữ liệu bắt buộc thông qua hàm openDatabase, việc này sẽ không làm được với một trình duyệt không hỗ trợ local database.
-
Hàm initDB mở cơ sở dữ liệu trong trình duyệt HTML5.
-
Sau khi mở cơ sở dữ liệu thành công, SQL DDL tạo bảng được thực thi. Cuối cùng những hàm truy vấn dữ liệu và hiển thị trên trang HTML được gọi.
Mỗi
hàm trong khối JavaScript thứ hai làm công việc truy xuất và hiển thị
dữ liệu. Sự thống nhất này một đặc điểm của kiến trúc Model 1 (xem http://www.ibm.com/developerworks/web/library/wa-offlineweb/index.html#resources),
đây cách đơn giản nhất để phát triển một ứng dụng Web. Với một nhiệm vụ
thực tế, ta có thể ứng dụng mô hình MVC (Model View Controller) để thực
hiện.
Để xây dựng danh sách ví dụ, hàm queryUpdate được gọi. Listing 4 hiển thị code:
1
2
3
4
5
6
7
8
9
10
11
12
13
14
15
16
17
18
19
20
21
22
23
24
25
26
27
28
29
30
31
32
33
34
35
36
37
38
39
| function queryAndUpdateOverview(){ //remove old table rows var dataRows = document.getElementById("itemData").getElementsByClassName("data"); while (dataRows.length > 0) { row = dataRows[0]; document.getElementById("itemData").removeChild(row); }; //read db data and create new table rows var query = "SELECT * FROM items;"; try { localDB.transaction(function(transaction){ transaction.executeSql(query, [], function(transaction, results){ for (var i = 0; i < results.rows.length; i++) { var row = results.rows.item(i); var li = document.createElement("li"); li.setAttribute("id", row['id']); li.setAttribute("class", "data"); li.setAttribute("onclick", "onSelect(this)"); var liText = document.createTextNode(row['amount'] + " x "+ row['name']); li.appendChild(liText); document.getElementById("itemData").appendChild(li); } }, function(transaction, error){ updateStatus("Error: " + error.code + "Message: " + error.message); }); }); } catch (e) { updateStatus("Error: Unable to select data from the db " + e + "."); }} |
Trong code phía trên:
-
Dữ liệu cũ được xóa từ cây mô hình DOM.
-
Một câu lệnh truy vấn tất cả dữ liệu được gọi.
-
Tất cả dữ liệu đươc hiển thị trong một danh sách.
-
Một sự kiện điều khiển, onSelect, được gọi khi một trong tất cả các đối tượng được click.
Những hàm trong khối này cũng chứa các điều khiển sự kiện cho thanh chứa các nút nhấn và danh sách bao gồm: onUpdate, onDelete, onCreate và onSelect. Listing
5 hiển thị code của hàm onUpdate. (onCreate và onDelete cũng có cấu
trúc tương tự, không được hiển thị ở đây, bạn có thể download tất cả
code của ứng dụng ví dụ trong phần phía dưới).
1
2
3
4
5
6
7
8
9
10
11
12
13
14
15
16
17
18
19
20
21
22
23
24
25
26
27
28
29
30
| function onUpdate(){ var id = document.itemForm.id.value; var amount = document.itemForm.amount.value; var name = document.itemForm.name.value; if (amount == "" || name == "") { updateStatus("'Amount' and 'Name' are required fields!"); } else { var query = "update items set amount=?, name=? where id=?;"; try { localDB.transaction(function(transaction){ transaction.executeSql(query, [amount, name, id], function(transaction, results){ if (!results.rowsAffected) { updateStatus("Error: No rows affected"); } else { updateForm("", "", ""); updateStatus("Updated rows:" + results.rowsAffected); queryAndUpdateOverview(); } }, errorHandler); }); } catch (e) { updateStatus("Error: Unable to perform an UPDATE " + e + "."); } }} |
Trong code phía trên:
-
Những trường giá trị được đọc vào kiểm tra tính hợp lệ(validated).
-
Nếu giá trị không hợp lệ, câu lệnh update được thực hiện.
-
Kết quả của những truy vấn được hiển thị trong trang HTML đã được chỉnh sửa.
Hàm
onSelect được thực thi khi người dùng chọn một đối tượng trong danh
sách. Form chi tiết sẽ được điền đầy đủ dữ liệu bằng cách sử dụng code
trong Listing 6 dưới đây:
1
2
3
4
5
6
7
8
9
10
11
12
13
14
15
16
17
18
19
20
21
22
| function onSelect(htmlLIElement){ var id = htmlLIElement.getAttribute("id"); query = "SELECT * FROM items where id=?;"; try { localDB.transaction(function(transaction){ transaction.executeSql(query, [id], function(transaction, results){ var row = results.rows.item(0); updateForm(row['id'], row['amount'], row['name']); }, function(transaction, error){ updateStatus("Error: " + error.code + "Message: " + error.message); }); }); } catch (e) { updateStatus("Error: Unable to select data from the db " + e + "."); }} |
Trong code phía trên:
-
Xác định ID của đối tượng được chọn
-
Câu lệnh truy vấn được thực hiện.
-
Một hàm sẽ update chi tiết form với danh sách dữ liệu được chọn.
Khối
JavaScript với những hàm tiện ích bắt đầu với các điều khiển dữ liệu,
với các tham số cần thiết truyền vào cho câu lệnh truy vấn.
1
2
3
4
5
6
7
| errorHandler = function(transaction, error){ updateStatus("Error: " + error.message); return true;}nullDataHandler = function(transaction, results){} |
Để
tránh việc dư thừa, những hàm tiện ích điền chi tiết bên trong form
(updateForm) và thông báo trạng thái (updateStatus), như phía dưới:
1
2
3
4
5
6
7
8
9
| function updateForm(id, amount, name){ document.itemForm.id.value = id; document.itemForm.amount.value = amount; document.itemForm.name.value = name;}function updateStatus(status){ document.getElementById('status').innerHTML = status;} |
Triển khai
Một chiếc điện thoại iPhone được dùng để chạy ứng dụng này với trình duyệt Safari.
File manifest phải được lưu bởi HTTP server với text/cache-manifest Mime
type. Sau khi mở ứng dụng trên iPhone, lưu trữ Bookmark và chuyển sang
chế độ offline airplane. Ứng dụng sẽ được mở khi bookmark được chọn, và
hoạt động không cần kết nối mạng.
Tóm tắt
Tiêu
điểm của bài viết này là kỹ thuật tạo một ứng dụng Web chạy offline. Mô
hình ứng dụng quản lý được minh họa bằng công nghệ HTML5 là lưu trữ dữ
liệu trên máy người dùng (local database).
http://www.mediafire.com/?nf530a5bereb8ne
Nguyễn Duy Hoàng (FPT Aptech Hà Nội)
Sưu tầm từ: http://tapchilaptrinh.vn/2012/07/30/tao-ung-dung-web-chay-offline-tren-thiet-bi-di-dong-bang-html5/
Link tham khảo : http://www.tcs.com/SiteCollectionDocuments/White%20Papers/TEG_Whitepaper_Developing_Offline_Web_Application_Using_HTML5_0212-1.pdf
http://labs.ft.com/2012/08/basic-offline-html5-web-app/
Link tham khảo : http://www.tcs.com/SiteCollectionDocuments/White%20Papers/TEG_Whitepaper_Developing_Offline_Web_Application_Using_HTML5_0212-1.pdf
http://labs.ft.com/2012/08/basic-offline-html5-web-app/
Chủ Nhật, 27 tháng 12, 2015
WORDPRESS
- Danh sách các tham số của WP_Query
- Danh sách filter và action hooks
- Plugin tạo layout miễn phí Page Builder by SiteOrigin
- 8 Starter Theme tốt nhất hỗ trợ tự thiết kế theme
- Page Builder by SiteOrigin – Plugin tạo layout miễn phí tốt nhất
- Automatically install plugins with themes for wordpress
- WordPress customizer sanitization examples
How to Add Facebook Comments to My Website
*This is an updated version of our previous tutorial on adding Facebook comments to your website.*
Facebook’s social plugin, Comments, allows you to quickly add comments to your website. Users not only have access to basic commenting abilities, they also have the option to cross-post their comments directly into their Facebook Timeline. Comment Administrators also gain access to a deeper stat-tracking system through Facebook Insights. While in the past the Comments box served merely as a static addition, it now has the capacity to provide direct communication between a website, a Facebook user, and all of his or her friends.
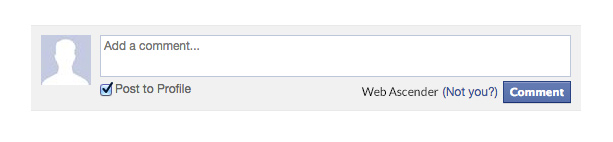
How to add the Facebook Comments Box to your website
1.) Create a Facebook App (Relax, it’s not that scary.)
- Visit http://developers.facebook.com
- Login with your Facebook account
- Select Apps from the navigation menu and choose Create a New App
- Fill in the Display Name and select a category that matches your app
- Click Create App - You’ll now be taken to your App’s Dashboard page
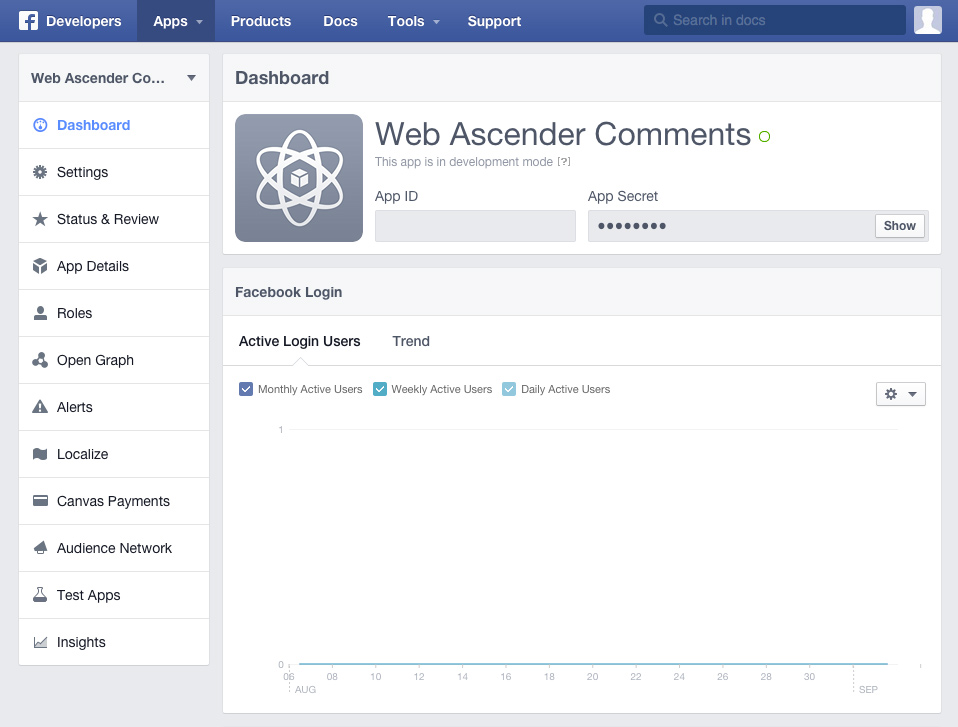
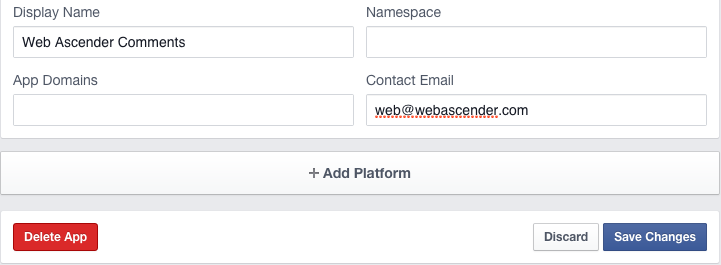
- Click the Settings link and add a Contact Email address and App Domain (your site URL) - Save your changes
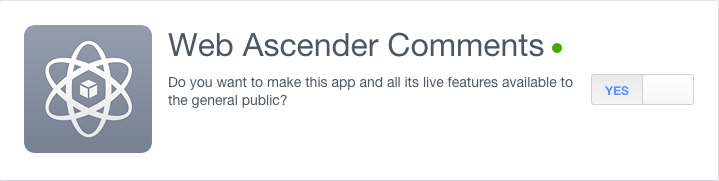
- Click the Status & Review link and toggle the switch to make the app public.
- Now, visit the plugin page https://developers.facebook.com/docs/plugins/comments
2.) Create your Comments box (you’re almost there!)
Facebook offers a simple and easy to use Comments code generator which looks something like this:
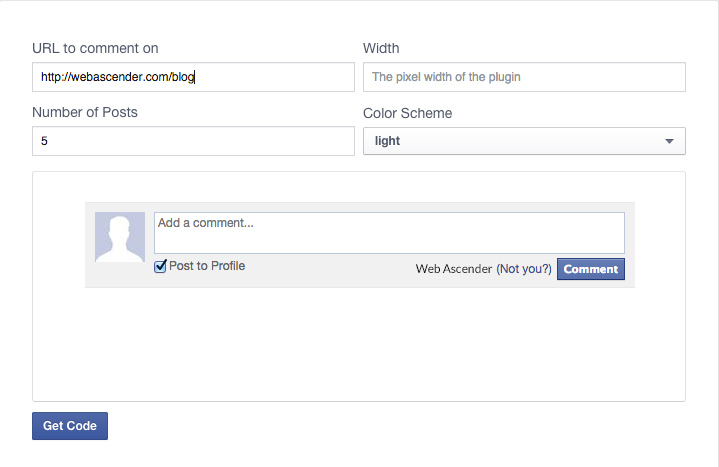
- Simply insert the URL you want Facebook to link to, the number of posts you would like displayed, and the width you want your Comments box to be - Click Get Code
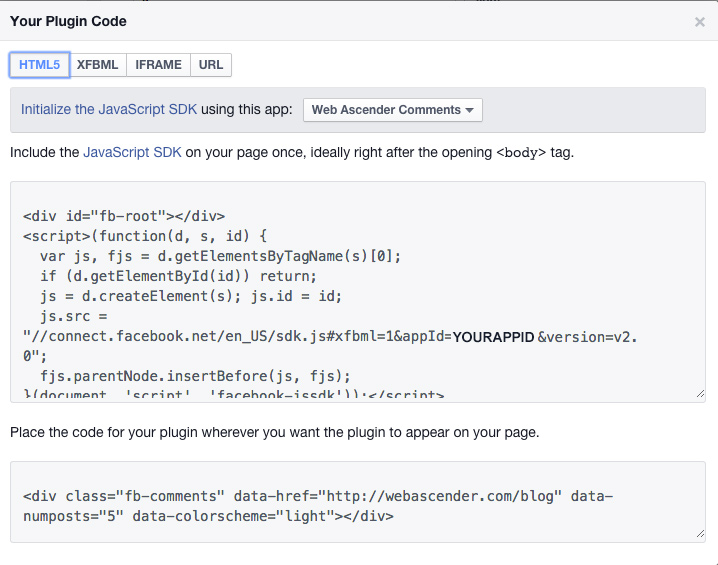
- Add the Javascript SDK (first box) after the opening <body> tag - Add this once to a page
- Add the Facebook Comments plugin (second box) to your page. This is where the comment box will be displayed.
Dynamic Comments (WordPress example):
If you would like comments to appear automatically with a unique url, change the data-href value to be your permalink url. For WordPress, it would look like this: data-href=“<?php the_permalink(); ?>”
Attributes And Moderation
Data Attributes
data-colorscheme : “light” or “dark” theme
data-href : the URL associated with the Comments box.
data-numposts : the number of comments to show by default
data-order-by : “social”, “reverse_time”, or “time”
data-width – the width of the plugin in pixels. For a fluid width, use 100%
Moderation
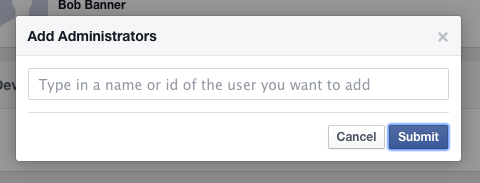
If you need multiple moderators for your newly added Comment box, visit your App’s Role page and add their Facebook ID as an Administrator.
Đăng ký:
Bài đăng (Atom)